为MacBook Pro配置一个像guake的终端

以前在Arch下经常使用一个名为guake的终端,体验很好,用MacBook Pro之后也想有个这样的终端,由于各种原因,这事一直耽搁着,但并没有放下,今天特意找了下,还真找到了。不费话了,进入正题。

让iTerm2的行为像guake

1)下载iTerm2,然后解压;

2)打开iTerm2,然后iTerm2–>Prefences…->Profiles;

3)创建一个新Profiles,命名为guake;

4)在Window选项中根据自己的喜好配置;

5)在Keys选项中激活"Show/hide iTerm2 with a system-wide hotkey",由于F12用来移动到Dashboard,只能用其他的快捷键了,可以根据自己喜好设置,我这里设置为⌘F12,(Note:⌘ + fn + F12);

继续阅读

Git 小结

本文是从日常开发的角度对 Git 的总结,主要内容如下:

  1. 搭建 Git 服务器
  2. 初始化远程仓库
  3. 多人协作开发
  4. 提交测试
  5. 修复 BUG

搭建 Git 服务器

1
2
3
4
5
6
7
8
9
10
11
12
13
14
15
16
17
18
19
20
21
22
23
24
25
26
27
28
29
30
31
32
33
34
35
36
37
38
39
40
41
42
43
44
45
46
47
48
49
50
51
52
53
54
55
56
57
58
59
60
61
62
63
64
65
66
67
68
69
70
71
72
73
74
75
76
77
78
79
80
81
82
83
84
85
86
87
// Step 1:创建一个 ‘git’ 用户并为其创建一个 .ssh 目录
$ sudo adduser git
$ su -l git
$ cd ~
$ mkdir .ssh

// Step 2:把开发者的 SSH 公钥添加到这个用户的 authorized_keys 文件中。
// 假设你通过 e-mail 收到了几个 公钥并存到了临时文件里
$ cat /tmp/id_rsa.john.pub >> ~/.ssh/authorized_keys
$ cat /tmp/id_rsa.josie.pub >> ~/.ssh/authorized_keys
$ cat /tmp/id_rsa.jessica.pub >> ~/.ssh/authorized_keys

// Preparation & Accounts Setup
$ sudo useradd -G git -d /home/john -m -s /bin/bash john
$ sudo useradd -G git -d /home/andrew -m -s /bin/bash andrew
$ sudo useradd -G git -d /home/robert -m -s /bin/bash robert

// Exist user change his primary group by newgrp command
$ sudo newgrp -g git john

// Step 3:使用 --bare 选项运行 git init 来设定一个空仓库,这会初始化一个不包含工作目录的仓库
$sudo mkdir /git
$sudo chown -R git /git
$ cd /git
$ mkdir project.git
$ cd project.git
$ git --bare --shared=group init

// if forget init with --shared=group, we can config with command:
$ git config -- core.sharedRepository ture

// Mac 下需要开启ssh并允许remote login
$launchctl start sshd
// System Preferences -> Sharing -> Remote Login -> All Users

// Step 4:Join,Josie 或者 Jessica 就可以把它加为远程仓库,
推送一个分支,从而把第一个版本的工程上 传到仓库里了
# 在 John 的电脑上
$ cd myproject
$ git init
$ git add .
$ git commit -m 'initial commit'
$ git remote add origin git@gitserver:/git/project.git
$ git push origin master

// Step 5:其他人的克隆和推送也一样变得很简单
$ git clone git@gitserver:/git/project.git
$ vim README
$ git commit -am 'fix for the README file'
$ git push origin master

// Step 6:用这个方法可以很快捷的为少数几个开发者架设一个可读写的 Git 服务


// 如何生成 SSH 公钥?
// Step 1:首先,确定一下是否已经有一个公钥了。SSH 公钥默认储存 在账户的 ~/.ssh 目录。
// 进入那里并查看其内容,有没有公钥一目了然:
$ cd ~/.ssh
$ ls
authorized_keys2 id_dsa known_hosts config id_dsa.pub

// Step 2:关键是看有没有用 文件名 和 文件名.pub 来命名的一对文件,
// 这个 文件名 通常是 id_dsa 或者 id_rsa。 .pub 文件是公钥,另一个文件是密钥。
// 假如没有这些文件(或者干脆连 .ssh 目录都没有),你可以用 ssh- keygen 的程序来建立它们,
// 该程序在 Linux/Mac 系统由 SSH 包提供, 在 Windows 上则包含在 MSysGit 包 里:
$ ssh-keygen
Generating public/private rsa key pair.
Enter file in which to save the key (/Users/schacon/.ssh/id_rsa):
Enter passphrase (empty for no passphrase):
Enter same passphrase again:
Your identification has been saved in /Users/schacon/.ssh/id_rsa.
Your public key has been saved in /Users/schacon/.ssh/id_rsa.pub.
The key fingerprint is:
43:c5:5b:5f:b1:f1:50:43:ad:20:a6:92:6a:1f:9a:3a schacon@agadorlaptop.local

// Step 3:它先要求你确认保存公钥的位置(.ssh/id_rsa),然后它会让你重复一个密码两次,
// 如果不想在使用公钥的 时候输入密码,可以留空。
// 现在,所有做过这一步的用户都得把它们的公钥给你
// 或者 Git 服务器的管理者(假设 SSH 服务被设定为使 用公钥机制)// 他们只需要复制 .put 文件的内容然后 e-email 之。公钥的样子大致如下:
$ cat ~/.ssh/id_rsa.pub
ssh-rsa AAAAB3NzaC1yc2EAAAABIwAAAQEAklOUpkDHrfHY17SbrmTIpNLTGK9Tjom/BWDSU
GPl+nafzlHDTYW7hdI4yZ5ew18JH4JW9jbhUFrviQzM7xlELEVf4h9lFX5QVkbPppSwg0cda3
Pbv7kOdJ/MTyBlWXFCR+HAo3FXRitBqxiX1nKhXpHAZsMciLq8V6RjsNAQwdsdMFvSlVK/7XA
t3FaoJoAsncM1Q9x5+3V0Ww68/eIFmb1zuUFljQJKprrX88XypNDvjYNby6vw/Pb0rwert/En
mZ+AW4OZPnTPI89ZPmVMLuayrD2cE86Z/il8b+gw3r3+1nKatmIkjn2so1d01QraTlMqVSsbx
NrRFi9wrf+M7Q== schacon@agadorlaptop.local

作为一个额外的防范措施,你可以用 Git 自带的 git-shell 简单工具来把 git 用户的活动限制在仅与 Git 相关。把它设为 git 用户登入的 shell,那么该用户就不能拥有主机正常的 shell 访问权。为了实现这一 点,需要指明用户的登入shell 是 git-shell ,而不是 bash 或者 csh。你可能得编辑 /etc/passwd 文件:

1
2
3
4
5
6
7
8
9
10
11
12
13
14
// Step 1:
$ sudo vim /etc/passwd

// Step 2:在文件末尾,你应该能找到类似这样的行
git:x:1000:1000::/home/git:/bin/sh

// Step 3:把 bin/sh 改为 /usr/bin/git-shell (或者用 which git-shell 查看它的位置)。该行修改后的样子如下
git:x:1000:1000::/home/git:/usr/bin/git-shell

// Step 4:现在 git 用户只能用 SSH 连接来推送和获取 Git 仓库,而不能直接使用主机 shell。
// 尝试登录的话,你会 看到下面这样的拒绝信息
$ ssh git@gitserver
fatal: What do you think I am? A shell? (你以为我是个啥?shell吗?)
Connection to gitserver closed. (gitserver 连接已断开。)
继续阅读

(翻译)Variable-Sized Items in UICollectionView

基本训练

我们以 “Single View Application” 为模板新建一个工程。在 ViewController.xib 上添加一个UICollectionView 让它覆盖整个 view。

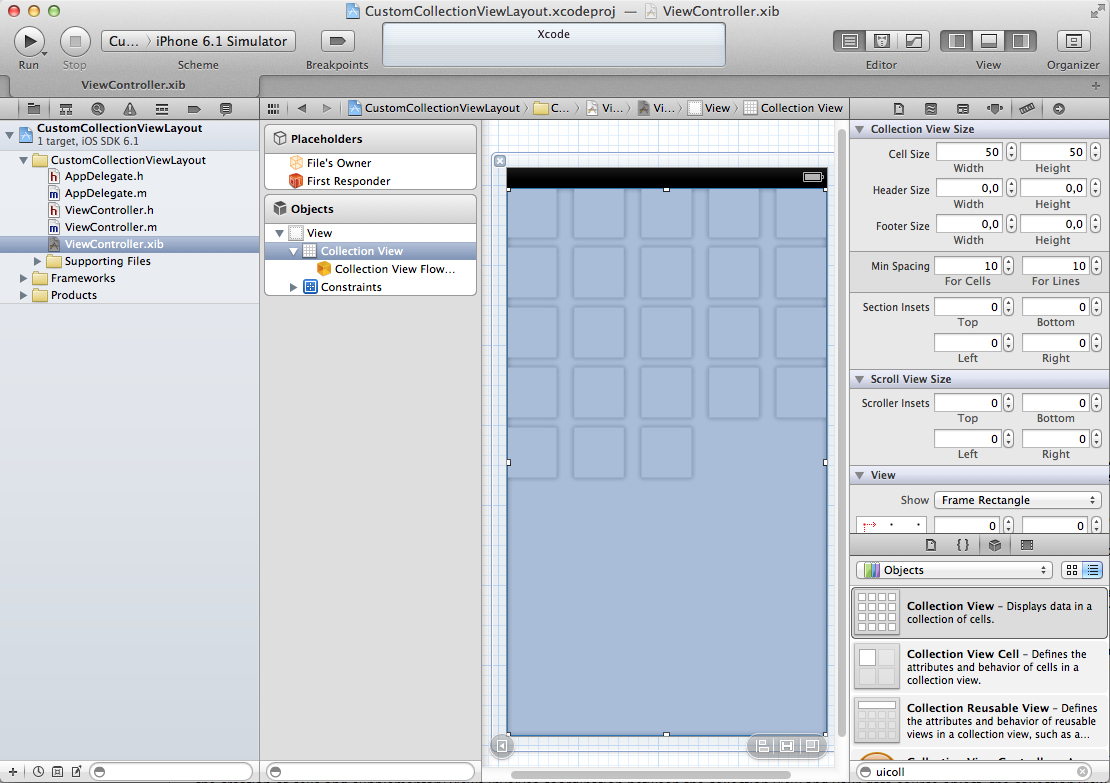
Collection View 和它的祖父类似,有 delegate 和 dataSource 两个 outlet,我们把它们连接到 “File’s Owner”,这里的 “File’s Owner” 是 ViewController 类。这样 Collection View 的内容和交互就受 ViewController 控制。我们也需要一个 outlet 来引用 Collection View,所以用 Assistant editor 增加一个。刚在 ViewController.h 中添加的 outlet property 可以是weak,因为作为 ViewController 的视图的子视图,它也会被充分的保留。

单元格

我们需要设计一个 Cell 原型来显示内容。如果你的 Collection View 是在 View controller’s XIB ,你必须在先在代码中注册 Cell 才能使用。如果你是在 Storyboard 中新建的 CollectionView,并在 CollectionView 的区域内创建的原型 Cell,那么你就不需要注册 Cell identifier 了。因为我们并没有从 Storyboard 中开始,所以需要手动来创建。

我们在 Interface Builder 中创建一个原型 Cell,设置它的背影为白色,添加一个 UILabel,添加 Label 到父视图边缘的约束,分别是 5 points 的距离。因为我们想让 Label 的文字来决定它的尺寸,所以选中 Label ,然后从 Editor menu 中选择 “Size to Fit Content”。后面我们会看到它是否会按照我们想像的那样工作。

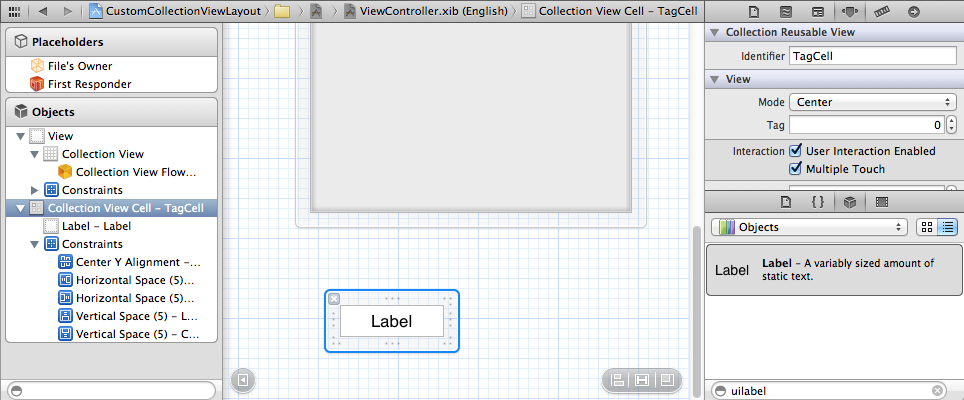
我们设置 Identifier 为 “TagCell” 以便我们能在设计中引用。

继续阅读