AVFoundation 使用笔记
使用一个框架时,我们可能有这么三个问题:
- 这个框架是做什么的?
- 为什么要使用这个框架而不是其他的框架?
- 怎么用这个框架?
###这个框架是做什么的?
Apple 在 iOS Technology Overview 中的 Audio Technologies 和 Video Technologies 分别是这么介绍 AVFoundation 的:
AV Foundation is an Objective-C interface for managing the recording and playback of audio and video. Use this framework for recording audio and when you need fine-grained control over the audio playback process.
AV Foundation provides advanced video playback and recording capabilities. Use this framework in situations where you need more control over the presentation or recording of video. For example, augmented reality apps could use this framework to layer live video content with other app-provided content.
从这两个介绍中我们可以知道 AVFoundation 是用来播放和录制音频和视频的。
在 AVFoundation Programming Guide 中则是这么介绍的:
AVFoundation is one of several frameworks that you can use to play and create time-based audiovisual media. It provides an Objective-C interface you use to work on a detailed level with time-based audiovisual data. For example, you can use it to examine, create, edit, or reencode media files. You can also get input streams from devices and manipulate video during realtime capture and playback.
从这里我们可以知道它不仅可以播放和创建基于时间的视听媒体,还可以让我们在很细微的层面去操作这些视听数据。例如,你可以使用它检查、创建、编辑或者重编码媒体文件。你还可以用它从设备那里拿到输出流,并且可以在实时的捕获和播放过程中操作视频。
所以结论就是:这个框架是处理音频和视频的,而且处理的粒度可以非常细。
###为什么要用这个框架而不是其他的框架?
在选择框架时我们的原则应该首先是使用 Apple 自己提供的框架,其次才是第三方框架。在 Apple 自带的框架中选择时,又应该按抽象程度从高到低去选择。在音频技术中,抽象程度是这样的:Media Player framework > AVFoundation > OpenAL > Core Audio; 在视频技术中:UIImagePickerController > AVKit > AVFoundation > Core Media.
在音视频技术中,抽象程度高于 AVFoundation 的技术多侧重于简单的播放和录制,要进行其他的操作时则要使用 AVFoundation,而且它的能力也比较强,所以通常要对媒体数据进行处理时,我们会经常使用到它,它不满足要求时才去寻找其他的技术。
怎么用这个框架?
前面提到 AVFoundation 是用来播放、录制和操作视听数据的,操作视听数据则可以细分为 Editing 和 Exporting,所以我们这里会介绍这个框架:Playback, Capture, Editing 和 Exporting 四个大方面的使用。
Playback
在介绍怎么使用 AVFoundation 播放视听媒体之前,我们还要聊聊在 AVFoundation 中是怎么表示媒体的。AVFoundation 中用来代表媒体最主要的类是 AVAsset, 一个 AVAsset 实例是一片或多片媒体数据(音频曲目和视频轨迹)集合的综合代表。它提供关于这个集合的信息,例如它的标题,持续时间,本身的展示尺寸等等。AVAsset 没有绑定特定的数据类型。它是其他用来从指定 URL 媒体创建资产实例和创建新构成的父类。
资产中每片单独的媒体数据是统一的类型称为track. 在经典的简单场景,一个轨迹代表音频组件,另一个轨迹代表视频组件;在一个复杂的构成中,这里可能有多个重叠的音视频轨迹。
你为播放配置资产的方法取决于你想要播放资产的种类,广义上来讲,这里有两大类型:基于文件的资产和基于流的资产。
-
加载和播放基于文件的资产。
- Create an asset using AVURLAsset.
- Create an instance of AVPlayerItem using the asset.
- Associate the item with an instance of AVPlayer.
- Wait until the item’s status property indicates that it’s ready to play (typically you use key-value observing to receive a notification when the status changes).
-
为播放创建和准备一个 HTTP 实时流。
NSURL *url = [NSURL URLWithString:@"<#Live stream URL#>];
// You may find a test stream at <http://devimages.apple.com/iphone/samples/bipbop/bipbopall.m3u8>.
self.playerItem = [AVPlayerItem playerItemWithURL:url];
[playerItem addObserver:self forKeyPath:@"status" options:0 context:&ItemStatusContext];
self.player = [AVPlayer playerWithPlayerItem:playerItem];
-
如果你不知道你拥有的 URL 是什么类型。
1)Try to initialize an AVURLAsset using the URL, then load its tracks key. If the tracks load successfully, then you create a player item for the asset.
2)If 1 fails, create an AVPlayerItem directly from the URL. Observe the player’s status property to determine whether it becomes playable.
Capture
为了管理来自相机、麦克风的捕获,你组装对象去表示输入和输出,使用 AVCaptureSession 的实例来协调它们之间的数据流。你最少需要:
- 一个 AVCaptureDevice 的实例来表示输入设备,例如相机或麦克风
- 一个 AVCaptureInput 具体子类的实例去配置来自输入设备的端口
- 一个 AVCaptureOutput 具体子类的实例去管理到电影或静态图片的输出
- 一个 AVCaptureSession 的实例来协调从输入到输出的数据流
Capturing Video Frames as UIImage Objects
// 1. Create and Configure a Capture Session
AVCaptureSession *session = [[AVCaptureSession alloc] init];
session.sessionPreset = AVCaptureSessionPresetMedium;

// 2. Create and Configure the Device and Device Input
AVCaptureDevice *device =
[AVCaptureDevice defaultDeviceWithMediaType:AVMediaTypeVideo];

NSError *error = nil;
AVCaptureDeviceInput *input =
[AVCaptureDeviceInput deviceInputWithDevice:device error:&error];
if (!input) {
    // Handle the error appropriately.
}
[session addInput:input];

// 3. Create and Configure the Video Data Output
AVCaptureVideoDataOutput *output = [[AVCaptureVideoDataOutput alloc] init];
[session addOutput:output];
output.videoSettings =
@{ (NSString *)kCVPixelBufferPixelFormatTypeKey : @(kCVPixelFormatType_32BGRA) };
output.minFrameDuration = CMTimeMake(1, 15);

dispatch_queue_t queue = dispatch_queue_create("MyQueue", NULL);
[output setSampleBufferDelegate:self queue:queue];
dispatch_release(queue);

// 4. Implement the Sample Buffer Delegate Method
- (void)captureOutput:(AVCaptureOutput *)captureOutput
didOutputSampleBuffer:(CMSampleBufferRef)sampleBuffer
fromConnection:(AVCaptureConnection *)connection {

    UIImage *image = imageFromSampleBuffer(sampleBuffer);
    // Add your code here that uses the image.
}
// 5. Starting and Stopping Recording
NSString *mediaType = AVMediaTypeVideo;

[AVCaptureDevice requestAccessForMediaType:mediaType completionHandler:^(BOOL granted) {
    if (granted)
    {
        //Granted access to mediaType
        [self setDeviceAuthorized:YES];
    }
    else
    {
        //Not granted access to mediaType
        dispatch_async(dispatch_get_main_queue(), ^{
                [[[UIAlertView alloc] initWithTitle:@"AVCam!"
                message:@"AVCam doesn't have permission to use Camera, please change privacy settings"
                delegate:self
                cancelButtonTitle:@"OK"
                otherButtonTitles:nil] show];
                [self setDeviceAuthorized:NO];
                });
    }
}];

[session startRunning];

// To stop recording, you send the session a stopRunning message.
Editing
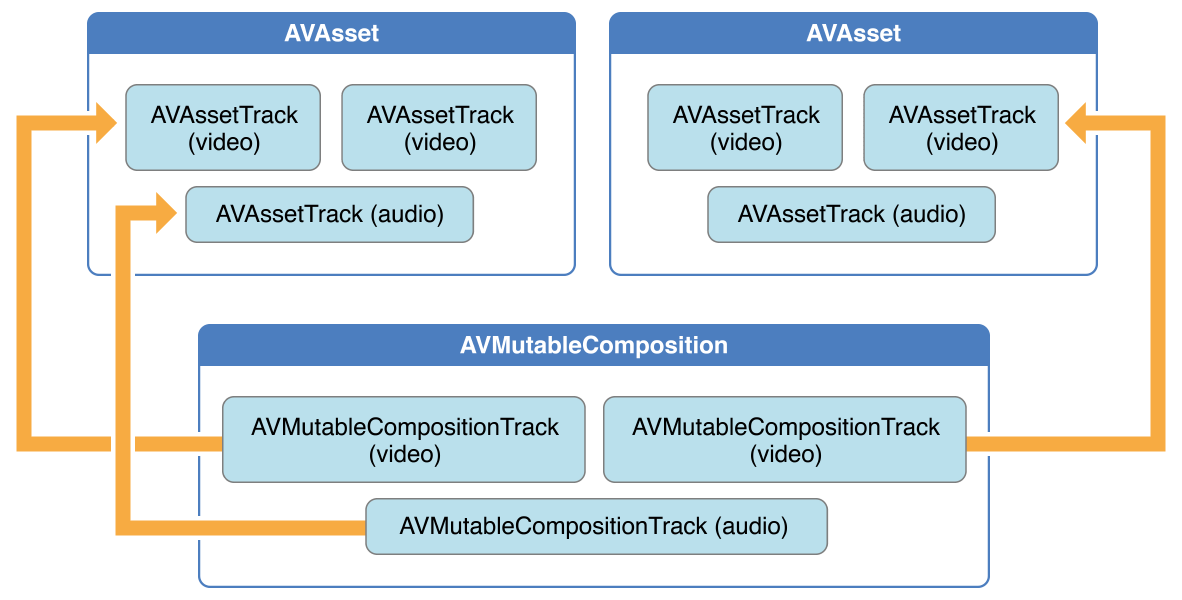
AVFoundation 框架提供了丰富的类来方便编辑音视资产。编辑 API 的核心是 composition. 一个 Compostion 是简单的来自一个或多个不同媒体资产的聚合。AVMutableCompostion 类提供插入和移除轨迹的接口,并且管理它们的时间顺序。图 3-1 展示了一个新的 composition 是如何用由现存资产联合形成的新资产拼装在一起的。如果你所有想要做的就是将多个资产按顺序的合成到一个单一的文件,那么这就是你得知道的所有细节。如果你想对你 compostion 里面的轨迹进行自定义的音频或视频处理,你相应地需要引入一个 audio mix 或 video compostion.

图 3-1
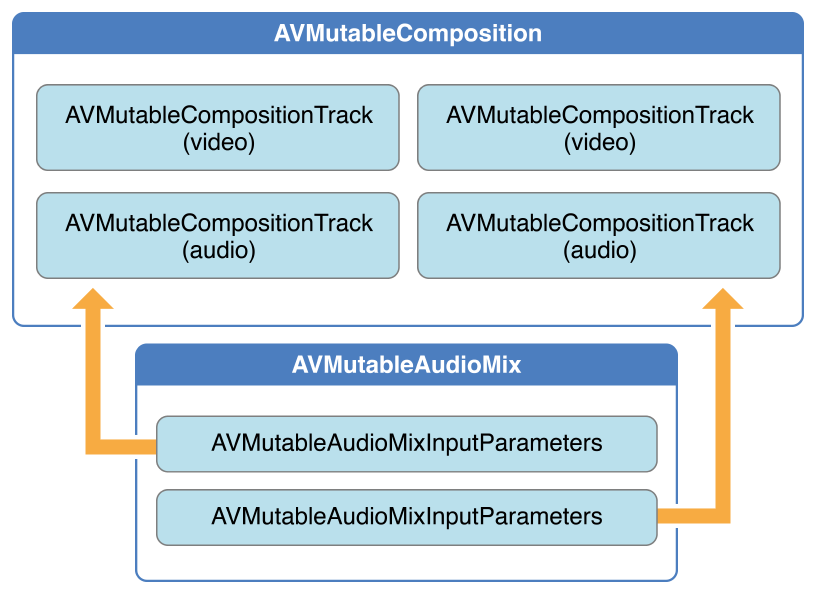
使用 AVMutableAudioMix 类, 你可以在你的 composition 的音频轨迹上进行自定义音频处理,像图 3-2 显示的。你现在可以指定一个最大的音量或者设置 volume ramp.

图 3-2
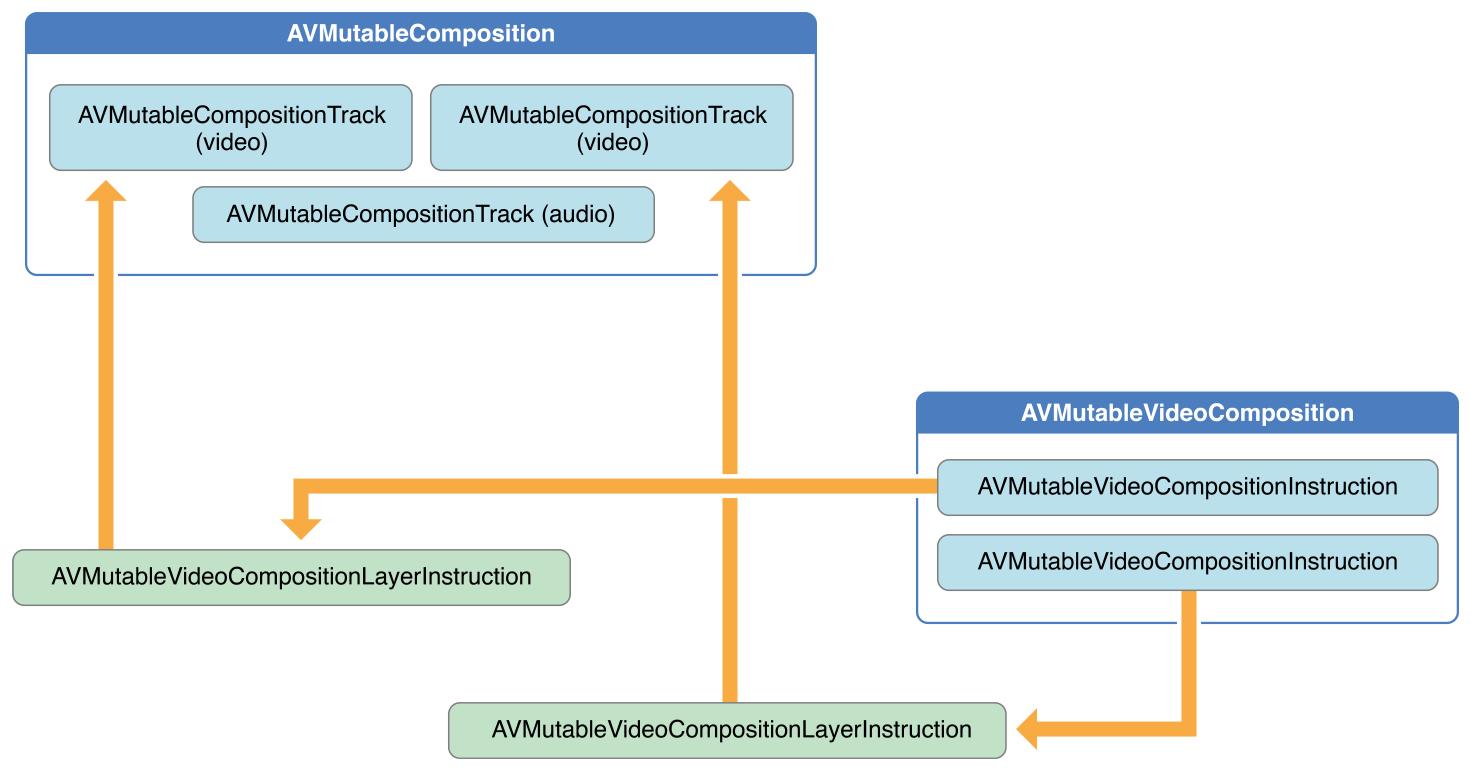
你为了编辑可以像图 3-3 那样使用 AVMutableVideoCompostion 类来直接操作你 compostion 里的视频轨迹. 拥有一个 video composition, 你可以为输出视频指定想要的渲染尺寸,缩放以及帧率。通过一个 video composition’s instruction(由 AVMutableVideoCompositionInstruction 类代表),你可以修改你视频的背景颜色和应用 layer instructions. 这些 layer instructions(由 AVMutableVideoCompositionLayerInstruction 类代表) 可以用来应用 transforms, transform ramps, opacity and opacity ramps。Video composition 类使用 animationTool 属性赋予你引入来自 Core Animation 框架效果的能力。

图 3-3
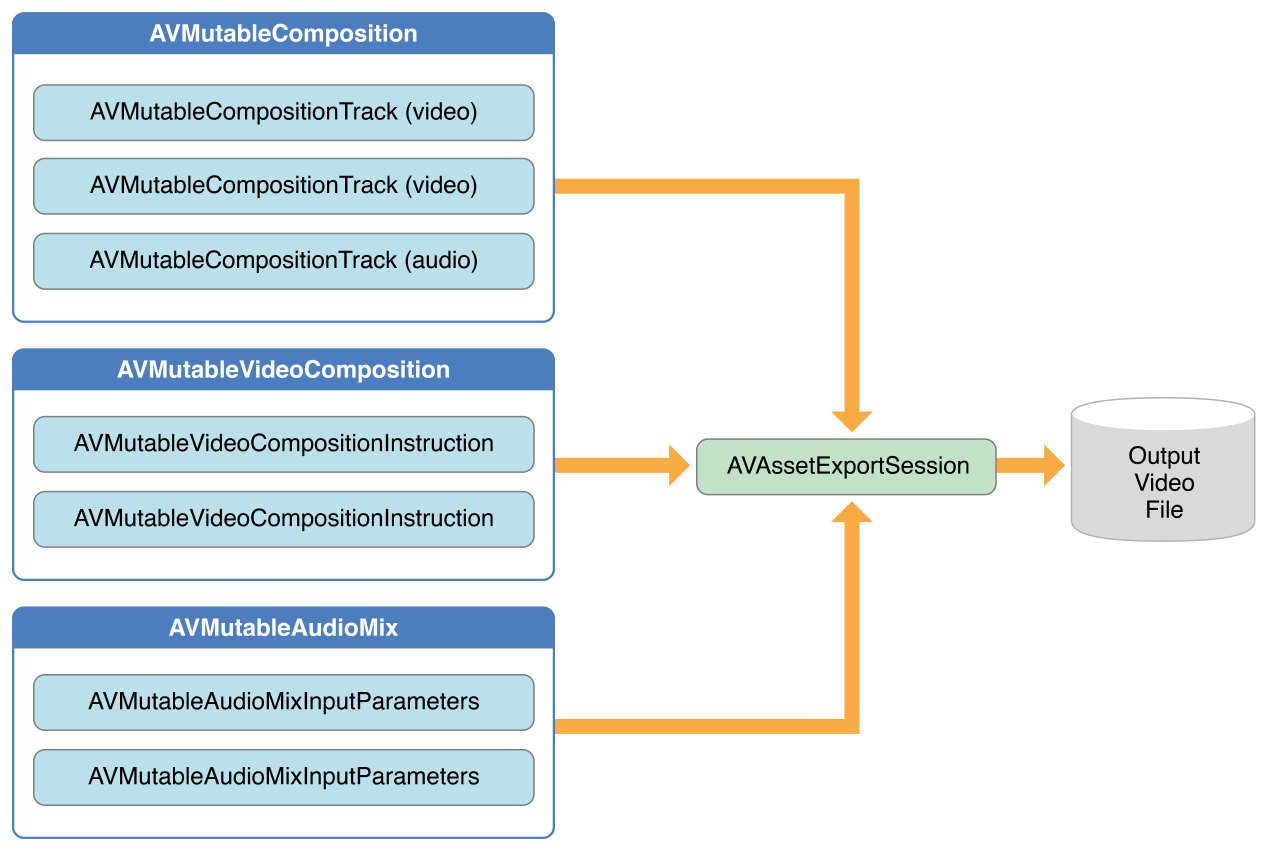
为了把你的 compostion 和 audio mix, video compostion 混合,你使用一个 AVAssetExportSession 对象,像图 3-4 那样。你用你的 compostion 初始化 export session, 然后简单地把你的 audio mix 和 video composition 相应地赋值给 audioMix 和 videoComposition 属性。

图 3-4
Combining Multiple Assets and Saving the Result to the Camera Roll
// 1. Creating the Composition
AVMutableComposition *mutableComposition = [AVMutableComposition composition];
AVMutableCompositionTrack *videoCompositionTrack = [mutableComposition addMutableTrackWithMediaType:AVMediaTypeVideo preferredTrackID:kCMPersistentTrackID_Invalid];
AVMutableCompositionTrack *audioCompositionTrack = [mutableComposition addMutableTrackWithMediaType:AVMediaTypeAudio preferredTrackID:kCMPersistentTrackID_Invalid];

// 2. Adding the Assets
AVAssetTrack *firstVideoAssetTrack = [[firstVideoAsset tracksWithMediaType:AVMediaTypeVideo] objectAtIndex:0];
AVAssetTrack *secondVideoAssetTrack = [[secondVideoAsset tracksWithMediaType:AVMediaTypeVideo] objectAtIndex:0];
[videoCompositionTrack insertTimeRange:CMTimeRangeMake(kCMTimeZero, firstVideoAssetTrack.timeRange.duration) ofTrack:firstVideoAssetTrack atTime:kCMTimeZero error:nil];
[videoCompositionTrack insertTimeRange:CMTimeRangeMake(kCMTimeZero, secondVideoAssetTrack.timeRange.duration) ofTrack:secondVideoAssetTrack atTime:firstVideoAssetTrack.timeRange.duration error:nil];
[audioCompositionTrack insertTimeRange:CMTimeRangeMake(kCMTimeZero, CMTimeAdd(firstVideoAssetTrack.timeRange.duration, secondVideoAssetTrack.timeRange.duration)) ofTrack:[[audioAsset tracksWithMediaType:AVMediaTypeAudio] objectAtIndex:0] atTime:kCMTimeZero error:nil];

// 3. Checking the Video Orientations
BOOL isFirstVideoPortrait = NO;
CGAffineTransform firstTransform = firstVideoAssetTrack.preferredTransform;
// Check the first video track's preferred transform to determine if it was recorded in portrait mode.
if (firstTransform.a == 0 && firstTransform.d == 0 && (firstTransform.b == 1.0 || firstTransform.b == -1.0) && (firstTransform.c == 1.0 || firstTransform.c == -1.0)) {
        isFirstVideoPortrait = YES;
}
BOOL isSecondVideoPortrait = NO;
CGAffineTransform secondTransform = secondVideoAssetTrack.preferredTransform;
// Check the second video track's preferred transform to determine if it was recorded in portrait mode.
if (secondTransform.a == 0 && secondTransform.d == 0 && (secondTransform.b == 1.0 || secondTransform.b == -1.0) && (secondTransform.c == 1.0 || secondTransform.c == -1.0)) {
        isSecondVideoPortrait = YES;
}
if ((isFirstVideoAssetPortrait && !isSecondVideoAssetPortrait) || (!isFirstVideoAssetPortrait && isSecondVideoAssetPortrait)) {
        UIAlertView *incompatibleVideoOrientationAlert = [[UIAlertView alloc] initWithTitle:@"Error!" message:@"Cannot combine a video shot in portrait mode with a video shot in landscape mode." delegate:self cancelButtonTitle:@"Dismiss" otherButtonTitles:nil];
            [incompatibleVideoOrientationAlert show];
                return;
}

// 4. Applying the Video Composition Layer Instructions
AVMutableVideoCompositionInstruction *firstVideoCompositionInstruction = [AVMutableVideoCompositionInstruction videoCompositionInstruction];
// Set the time range of the first instruction to span the duration of the first video track.
firstVideoCompositionInstruction.timeRange = CMTimeRangeMake(kCMTimeZero, firstVideoAssetTrack.timeRange.duration);
AVMutableVideoCompositionInstruction * secondVideoCompositionInstruction = [AVMutableVideoCompositionInstruction videoCompositionInstruction];
// Set the time range of the second instruction to span the duration of the second video track.
secondVideoCompositionInstruction.timeRange = CMTimeRangeMake(firstVideoAssetTrack.timeRange.duration, CMTimeAdd(firstVideoAssetTrack.timeRange.duration, secondVideoAssetTrack.timeRange.duration));
AVMutableVideoCompositionLayerInstruction *firstVideoLayerInstruction = [AVMutableVideoCompositionLayerInstruction videoCompositionLayerInstructionWithAssetTrack:videoCompositionTrack];
// Set the transform of the first layer instruction to the preferred transform of the first video track.
[firstVideoLayerInstruction setTransform:firstTransform atTime:kCMTimeZero];
AVMutableVideoCompositionLayerInstruction *secondVideoLayerInstruction = [AVMutableVideoCompositionLayerInstruction videoCompositionLayerInstructionWithAssetTrack:videoCompositionTrack];
// Set the transform of the second layer instruction to the preferred transform of the second video track.
[secondVideoLayerInstruction setTransform:secondTransform atTime:firstVideoAssetTrack.timeRange.duration];
firstVideoCompositionInstruction.layerInstructions = @[firstVideoLayerInstruction];
secondVideoCompositionInstruction.layerInstructions = @[secondVideoLayerInstruction];
AVMutableVideoComposition *mutableVideoComposition = [AVMutableVideoComposition videoComposition];
mutableVideoComposition.instructions = @[firstVideoCompositionInstruction, secondVideoCompositionInstruction];

// 5. Setting the Render Size and Frame Duration
CGSize naturalSizeFirst, naturalSizeSecond;
// If the first video asset was shot in portrait mode, then so was the second one if we made it here.
if (isFirstVideoAssetPortrait) {
    // Invert the width and height for the video tracks to ensure that they display properly.
        naturalSizeFirst = CGSizeMake(firstVideoAssetTrack.naturalSize.height, firstVideoAssetTrack.naturalSize.width);
            naturalSizeSecond = CGSizeMake(secondVideoAssetTrack.naturalSize.height, secondVideoAssetTrack.naturalSize.width);
}
else {
    // If the videos weren't shot in portrait mode, we can just use their natural sizes.
        naturalSizeFirst = firstVideoAssetTrack.naturalSize;
            naturalSizeSecond = secondVideoAssetTrack.naturalSize;
}
float renderWidth, renderHeight;
// Set the renderWidth and renderHeight to the max of the two videos widths and heights.
if (naturalSizeFirst.width > naturalSizeSecond.width) {
        renderWidth = naturalSizeFirst.width;
}
else {
        renderWidth = naturalSizeSecond.width;
}
if (naturalSizeFirst.height > naturalSizeSecond.height) {
        renderHeight = naturalSizeFirst.height;
}
else {
        renderHeight = naturalSizeSecond.height;
}
mutableVideoComposition.renderSize = CGSizeMake(renderWidth, renderHeight);
// Set the frame duration to an appropriate value (i.e. 30 frames per second for video).
mutableVideoComposition.frameDuration = CMTimeMake(1,30);

// 6. Exporting the Composition and Saving it to the Camera Roll
// Create a static date formatter so we only have to initialize it once.
static NSDateFormatter *kDateFormatter;
if (!kDateFormatter) {
        kDateFormatter = [[NSDateFormatter alloc] init];
            kDateFormatter.dateStyle = NSDateFormatterMediumStyle;
                kDateFormatter.timeStyle = NSDateFormatterShortStyle;
}
// Create the export session with the composition and set the preset to the highest quality.
AVAssetExportSession *exporter = [[AVAssetExportSession alloc] initWithAsset:mutableComposition presetName:AVAssetExportPresetHighestQuality];
// Set the desired output URL for the file created by the export process.
exporter.outputURL = [[[[NSFileManager defaultManager] URLForDirectory:NSDocumentDirectory inDomain:NSUserDomainMask appropriateForURL:nil create:@YES error:nil] URLByAppendingPathComponent:[kDateFormatter stringFromDate:[NSDate date]]] URLByAppendingPathExtension:CFBridgingRelease(UTTypeCopyPreferredTagWithClass((CFStringRef)AVFileTypeQuickTimeMovie, kUTTagClassFilenameExtension))];
// Set the output file type to be a QuickTime movie.
exporter.outputFileType = AVFileTypeQuickTimeMovie;
exporter.shouldOptimizeForNetworkUse = YES;
exporter.videoComposition = mutableVideoComposition;
// Asynchronously export the composition to a video file and save this file to the camera roll once export completes.
[exporter exportAsynchronouslyWithCompletionHandler:^{
        dispatch_async(dispatch_get_main_queue(), ^{
                    if (exporter.status == AVAssetExportSessionStatusCompleted) {
                                    ALAssetsLibrary *assetsLibrary = [[ALAssetsLibrary alloc] init];
                                                if ([assetsLibrary videoAtPathIsCompatibleWithSavedPhotosAlbum:exporter.outputURL]) {
                                                                    [assetsLibrary writeVideoAtPathToSavedPhotosAlbum:exporter.outputURL completionBlock:NULL];
                                                                                }
                                                                                        }
                                                                                            });
}];
Exporting
为了导出视听资产,你必须使用 AVFoundation 框架提供的导出 API. AVAssetExportSession 类为简单的导出需求提供接口,例如修改文件格式或者裁剪资产的长度。对于更深的导出需求,使用 AVAssetReader 和 AVAssetWriter 类。
当你想要操作资产的内容时使用 AVAssetReader. 例如,你可能读取资产中的音频轨迹去生成表示声波的图形。使用 AVAssetWriter 从像 sample buffers 或 still images 的媒体中生成资产。
Reading an Asset
每个 AVAssetReader 对象一次只能关联单个的资产, 但是这个资产可能包含多个轨迹。基于这个原因,为了配置如何去读取媒体数据,你必须在读取前给你的 asset reader 赋予 AVAssetReaderOutput 的具体子类。这里有三个具体的子类:AVAssetReaderTrackOutput, AVAssetReaderAudioMixOutput 和 AVAssetReaderVideoCompositionOutput.
- Creating the Asset Reader
NSError *outError;
AVAsset *someAsset = <#AVAsset that you want to read#>;
AVAssetReader *assetReader = [AVAssetReader assetReaderWithAsset:someAsset error:&outError];
BOOL success = (assetReader != nil);
- Setting Up the Asset Reader Outputs
AVAsset *localAsset = assetReader.asset;
// Get the audio track to read.
AVAssetTrack *audioTrack = [[localAsset tracksWithMediaType:AVMediaTypeAudio] objectAtIndex:0];
// Decompression settings for Linear PCM
NSDictionary *decompressionAudioSettings = @{ AVFormatIDKey : [NSNumber numberWithUnsignedInt:kAudioFormatLinearPCM] };
// Create the output with the audio track and decompression settings.
AVAssetReaderOutput *trackOutput = [AVAssetReaderTrackOutput assetReaderTrackOutputWithTrack:audioTrack outputSettings:decompressionAudioSettings];
// Add the output to the reader if possible.
if ([assetReader canAddOutput:trackOutput])
        [assetReader addOutput:trackOutput];
- Reading the Asset’s Media Data
// Start the asset reader up.
[self.assetReader startReading];
BOOL done = NO;
while (!done)
{
    // Copy the next sample buffer from the reader output.
    CMSampleBufferRef sampleBuffer = [self.assetReaderOutput copyNextSampleBuffer];
    if (sampleBuffer)
    {
        // Do something with sampleBuffer here.
        CFRelease(sampleBuffer);
        sampleBuffer = NULL;
    }
    else
    {
        // Find out why the asset reader output couldn't copy another sample buffer.
        if (self.assetReader.status == AVAssetReaderStatusFailed)
        {
            NSError *failureError = self.assetReader.error;
            // Handle the error here.
        }
        else
        {
            // The asset reader output has read all of its samples.
            done = YES;
        }
    }
}
Writing an Asset
AVAssetWriter 类将多个来源的媒体数据按指定的文件格式写出到单一的文件。你不需要将你的 asset writer 对象和指定的资产关联起来,但是你必须为你想要创建的输出文件使用一个 asset writer. 因为一个 asset writer 可以写出来自多个源的媒体数据,你必须为你想要写出到输出文件的单独轨迹创建一个 AVAssetWriterInput 对象。每个 AVAssetWriterInput 对象期望收到 CMSampleBufferRef 对象格式的数据,但是如果你想追加 CVPixelBufferRef 对象到你的 asset writer input, 使用 AVAssetWriterInputPixelBufferAdaptor 类。
// 1. Creating the Asset Writer
NSError *outError;
NSURL *outputURL = <#NSURL object representing the URL where you want to save the video#>;
AVAssetWriter *assetWriter = [AVAssetWriter assetWriterWithURL:outputURL
fileType:AVFileTypeQuickTimeMovie
error:&outError];
BOOL success = (assetWriter != nil);

// 2. Setting Up the Asset Writer Inputs
// Configure the channel layout as stereo.
AudioChannelLayout stereoChannelLayout = {
    .mChannelLayoutTag = kAudioChannelLayoutTag_Stereo,
    .mChannelBitmap = 0,
    .mNumberChannelDescriptions = 0
};

// Convert the channel layout object to an NSData object.
NSData *channelLayoutAsData = [NSData dataWithBytes:&stereoChannelLayout length:offsetof(AudioChannelLayout, mChannelDescriptions)];

// Get the compression settings for 128 kbps AAC.
NSDictionary *compressionAudioSettings = @{
AVFormatIDKey         : [NSNumber numberWithUnsignedInt:kAudioFormatMPEG4AAC],
                        AVEncoderBitRateKey   : [NSNumber numberWithInteger:128000],
                        AVSampleRateKey       : [NSNumber numberWithInteger:44100],
                        AVChannelLayoutKey    : channelLayoutAsData,
                        AVNumberOfChannelsKey : [NSNumber numberWithUnsignedInteger:2]
};

// Create the asset writer input with the compression settings and specify the media type as audio.
AVAssetWriterInput *assetWriterInput = [AVAssetWriterInput assetWriterInputWithMediaType:AVMediaTypeAudio outputSettings:compressionAudioSettings];
// Add the input to the writer if possible.
if ([assetWriter canAddInput:assetWriterInput])
    [assetWriter addInput:assetWriterInput];

// 3. Writing Media Data
// Prepare the asset writer for writing.
    [self.assetWriter startWriting];
    // Start a sample-writing session.
    [self.assetWriter startSessionAtSourceTime:kCMTimeZero];
    // Specify the block to execute when the asset writer is ready for media data and the queue to call it on.
    [self.assetWriterInput requestMediaDataWhenReadyOnQueue:myInputSerialQueue usingBlock:^{
        while ([self.assetWriterInput isReadyForMoreMediaData])
        {
            // Get the next sample buffer.
            CMSampleBufferRef nextSampleBuffer = [self copyNextSampleBufferToWrite];
            if (nextSampleBuffer)
            {
                // If it exists, append the next sample buffer to the output file.
                [self.assetWriterInput appendSampleBuffer:nextSampleBuffer];
                CFRelease(nextSampleBuffer);
                nextSampleBuffer = nil;
            }
            else
            {
                // Assume that lack of a next sample buffer means the sample buffer source is out of samples and mark the input as finished.
                [self.assetWriterInput markAsFinished];
                break;
            }
        }
    }];
Reference:
- iOS Technology Overview
- AVFoundation Programming Guide