圆锥渐变的一种简单实现
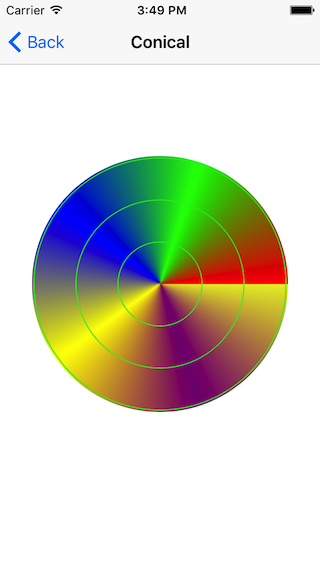
Core Graphics 支持两种渐变:线性(Axial)和径向(Radial)渐变,但是有的时候我们可能会用到圆锥(Conical)渐变,例如在扫描附近的目标时,交互可能用上带这种渐变的雷达效果,它长这样:


要实现这样一种渐变你会怎么做呢?我的想法是从渐变的本质着手。渐变是从一种颜色渐渐变化成另外一种颜色,而圆锥渐变是根据角度渐渐变化。我们把界面看成位图,这样可以由点的位置得到它的角度,继而根据角度线性插值可以得到它的颜色,最终就可以得到圆锥渐变。
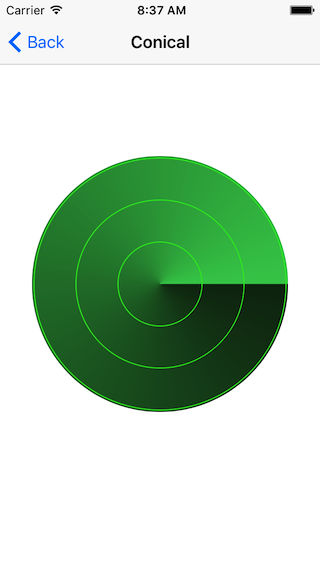
想法有了,接下来我们用它来实现上图中 Find My iPhone 图标的雷达效果吧。
首先定义一个 CALayer 的子类 ConicalLayer,
// ConicalLayer.h
@interface ConicalLayer : CALayer

/// An array of CGColorRef objects defining the color of each gradient stop.
@property(copy) NSArray *colors;

@end

// ConicalLayer.m
- (id)init
{
    if (!(self = [super init])) {
        return nil;
    }

    _needsDisplayOnBoundsChange = YES;

    return self;
}

- (void)drawInContext:(CGContextRef)ctx
{
    // Draw background
    CGRect rect = CGContextGetClipBoundingBox(ctx);
    CGContextSetFillColorWithColor(ctx, self.backgroundColor);
    CGContextFillRect(ctx, rect);

    if (self.colors.count < 1) {
        return;
    }
    else if (self.colors.count < 2) {
        // There is only one color so directly draw with it
        CGColorRef color = (__bridge CGColorRef)(self.colors.firstObject);
        CGContextSetFillColorWithColor(ctx, color);
        CGContextFillRect(ctx, rect);
        return;
    }

    CGColorSpaceRef colorSpace = CGColorSpaceCreateDeviceRGB();

    size_t width = rect.size.width;
    size_t height = rect.size.height;

    size_t bitsPerCompoent = 8;
    size_t bytesPerRow = width * 4;

    size_t bitmapByteCount = bytesPerRow * height;

    uint32_t *bitmapData = calloc( bitmapByteCount / sizeof(uint32_t), sizeof(uint32_t) );

    // Map color to linear array each compoent occupy 1 byte
    uint8_t *colorCompoents = calloc(self.colors.count * 4, sizeof(uint8_t));

    for (int i = 0; i < self.colors.count; ++i) {
        CGColorRef c = (__bridge CGColorRef)(self.colors[i]);

        const CGFloat *compoents = CGColorGetComponents(c);

        uint8_t red = compoents[0] * 255;
        uint8_t green = compoents[1] * 255;
        uint8_t blue = compoents[2] * 255;
        uint8_t alpha = compoents[3] * 255;

        int index = i * 4;
        *(colorCompoents + index) = red;
        *(colorCompoents + index + 1) = green;
        *(colorCompoents + index + 2) = blue;
        *(colorCompoents + index + 3) = alpha;
    }

    // Creating a Bitmap Graphics Context for conical gradient
    CGBitmapInfo bitmapInfo = kCGImageAlphaPremultipliedLast | kCGBitmapByteOrder32Little;

    CGContextRef bitmapGraphicsCtx = CGBitmapContextCreate(bitmapData, width, height, bitsPerCompoent, bytesPerRow, colorSpace, bitmapInfo);

    // Creating conical gradient from a Bitmap Graphics Context
    CGImageRef conicalGradientImage = CGBitmapContextCreateImage(bitmapGraphicsCtx);

    CGContextRelease(bitmapGraphicsCtx);

    free(colorCompoents);

    free(bitmapData);

    CGColorSpaceRelease(colorSpace);

    // Draws conical gradient image into a graphics context.
    CGContextDrawImage(ctx, rect, conicalGradientImage);

    CGImageRelease(conicalGradientImage);

    // Draws three concentric
    CGContextBeginPath(ctx);

    CGFloat halfWidth = 0.5 * CGRectGetWidth(rect);
    CGFloat maxRadii = 0.8 * halfWidth;
    CGFloat radii = floor(0.33 * maxRadii);

    for (int i = 1; i < 4; ++i) {
        CGFloat r = radii * i;
        CGFloat dx = halfWidth - r;
        CGRect ellipseRect = CGRectInset(rect, dx, dx);

        CGContextAddEllipseInRect(ctx, ellipseRect);
    }

    CGContextSetRGBStrokeColor(ctx, 41/255.0, 234/255.0, 35/255.0, 1.0);
    CGContextStrokePath(ctx);
}

- (BOOL)needsDisplayOnBoundsChange
{
    return _needsDisplayOnBoundsChange;
}

- (void)setNeedsDisplayOnBoundsChange:(BOOL)needsDisplayOnBoundsChange
{
}
现在我们把架子搭起来了,但是还没有往位图里面填充颜色,在这之前,对这段代码稍作解释,首先是我覆盖了needsDisplayOnBoundsChange 属性的 getter 和 setter 方法,原因是我设置图层关联的背景颜色时会触发这个属性变 NO,导致 drawInContext 不会被调用,我认为这是 Apple 的一个 bug,已经作了反馈,所以这里我使用了这么一个绕过的方法。
其次,我把 RGB 颜色空间的颜色分量取出来放在了一个一维数组里用来备用;最后是 bitmapInfo 要或上 kCGBitmapByteOrder32Little,不然结果会不正确。
接下来就是要填充位图的颜色,代码如下:
    // Create conical gradient bitmap data
    CGFloat centerX = width * 0.5;
    CGFloat centerY = height * 0.5;

    double baseAngle = 2*M_PI / (self.colors.count - 1);

    for (int i = 0; i < height; ++i) {
        for (int j = 0; j < width; ++j) {
            CGFloat x = j - centerX;
            CGFloat y = i - centerY;

            // define atan2 uniquely one uses the principal value in the range (−π, π]. That is, −π < atan2(y, x) ≤ π.
            double angle = atan2(y, x);

            // Convert atan2 result angle to range [0, 2π]
            if (angle < 0) {
                angle += 2 * M_PI;
            }

            // 0-360 map to linear gradient
            double angleRatio = angle / baseAngle;
            int colorIndex = angleRatio; // How many times of base angle?

            angle -= colorIndex * baseAngle;
            angleRatio = angle / baseAngle;

            colorIndex *= 4;

            uint8_t red0 = colorCompoents[colorIndex];
            uint8_t red1 = colorCompoents[colorIndex + 4];

            // Green index
            colorIndex += 1;
            uint8_t green0 = colorCompoents[colorIndex];
            uint8_t green1 = colorCompoents[colorIndex + 4];

            // Blue index
            colorIndex += 1;
            uint8_t blue0 = colorCompoents[colorIndex];
            uint8_t blue1 = colorCompoents[colorIndex + 4];

            // Alpha index
            colorIndex += 1;
            uint8_t alpha0 = colorCompoents[colorIndex];
            uint8_t alpha1 = colorCompoents[colorIndex + 4];

//            uint8_t red = red0 + angleRatio * (red1 - red0);
//            uint8_t green = green0 + angleRatio * (green1 - green0);
//            uint8_t blue = blue0 + angleRatio * (blue1 - blue0);
//            uint8_t alpha = alpha0 + angleRatio * (alpha1 - alpha0);

            uint8_t red = lerp(red0, red1, angleRatio);
            uint8_t green = lerp(green0, green1, angleRatio);
            uint8_t blue = lerp(blue0, blue1, angleRatio);
            uint8_t alpha = lerp(alpha0, alpha1, angleRatio);

            // Multiple alpha
            float a = alpha / 255.0;

            red *= a;
            green *= a;
            blue *= a;

            unsigned long index = i * width + j;

            *(bitmapData + index) = (red << 24) | (green << 16) | (blue << 8) | alpha;
        }
    }
同样也稍微解释下其中的代码,首先是位图的填充要按照先行后列的顺序,行对就宽,列对应高;其次反正切函数的值域是(−π, π],所以要把它们映射到[0, 2π];然后我们根据角度对应的区间,选择起始和终点颜色,再由线性插值得到各自的颜色分量,实践中每个颜色分量还乘上了当前的透明度,最后合成该点的颜色。
##Reference:
Conical gradient in Qt (without QConicalGradient)
MKGradientView
Color gradient
Linear interpolation
atan2